"As always your video was easy to follow and I had very few problems. This is the first of three that I am making and while I am not completely happy with the finish on this one, I could not wait to share it with you. All three are being cut from 4/4 cherry and my wife and I are giving to good friends as wedding gifts."
"There are three differences between your clock and the one that I built. I included the last name initial of the married couple at the top. I included the year of the wedding at the bottom. I used a smaller rough cut end mill and finish cut ball nose on the floral pattern for greater detail."


 Previous Post
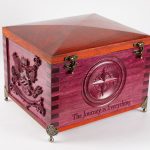 Next Post


